Master mob spawning in Minecraft: tips and server control

TL;DR:
- Mob spawning follows a precise system based on light levels, surface types, and space, not randomness.
- Controlling spawn conditions through lighting, slabs, carpets, and environmental management can optimize resource gathering and safety.
Mob spawning in Minecraft looks chaotic from the outside. You build a cozy survival base, step away for a few minutes, and suddenly creepers are appearing in your living room. Most players assume the game is just throwing enemies at them randomly. It isn't. Mob spawning follows a precise, rule-based system that you can learn, predict, and manipulate entirely to your advantage. Whether you're playing solo survival or managing a busy multiplayer server, mastering these mechanics will fundamentally change how you play and how well your world runs.
Table of Contents
- Mob spawning basics: light, blocks, and game ticks
- Spawn-proofing strategies: torches, slabs, carpets, and spacing
- Advanced control: mob switches and mob cap manipulation
- Optimizing for gameplay: practical applications and common mistakes
- The hidden complexity and game-changing power of mob spawning mechanics
- Unlock further Minecraft mastery with Gaia Legends guides
- Frequently asked questions
Key Takeaways
| Point | Details |
|---|---|
| Mob spawning follows strict rules | Hostile and passive mobs spawn based on block type, light level, and game tick intervals. |
| Spawn-proofing is essential | Use torches, slabs, and carpets to prevent unwanted mobs and secure your base or server. |
| Server control tactics matter | Mob switches and lighting strategies give admins global spawn control and optimize farm rates. |
| Gameplay optimization prevents mistakes | Applying spawn mechanics helps players avoid pitfalls and boost resource generation. |
| Understanding mechanics unlocks mastery | Knowledge of mob spawning transforms gameplay, enabling new strategies and server management. |
Mob spawning basics: light, blocks, and game ticks
Now that we've established mob spawning isn't random, let's break down what actually causes mobs to appear in-game.
At the core, every mob spawn attempt in Minecraft is governed by three things: the light level of the block, the type of surface, and the available space. The game runs these checks constantly. Every single game tick, which is 1/20th of a second, the engine scans eligible chunks and tries to place mobs based on the current conditions. That means the game is making 20 spawn attempts per second across your loaded world. Understanding how those checks work gives you real power over your environment.
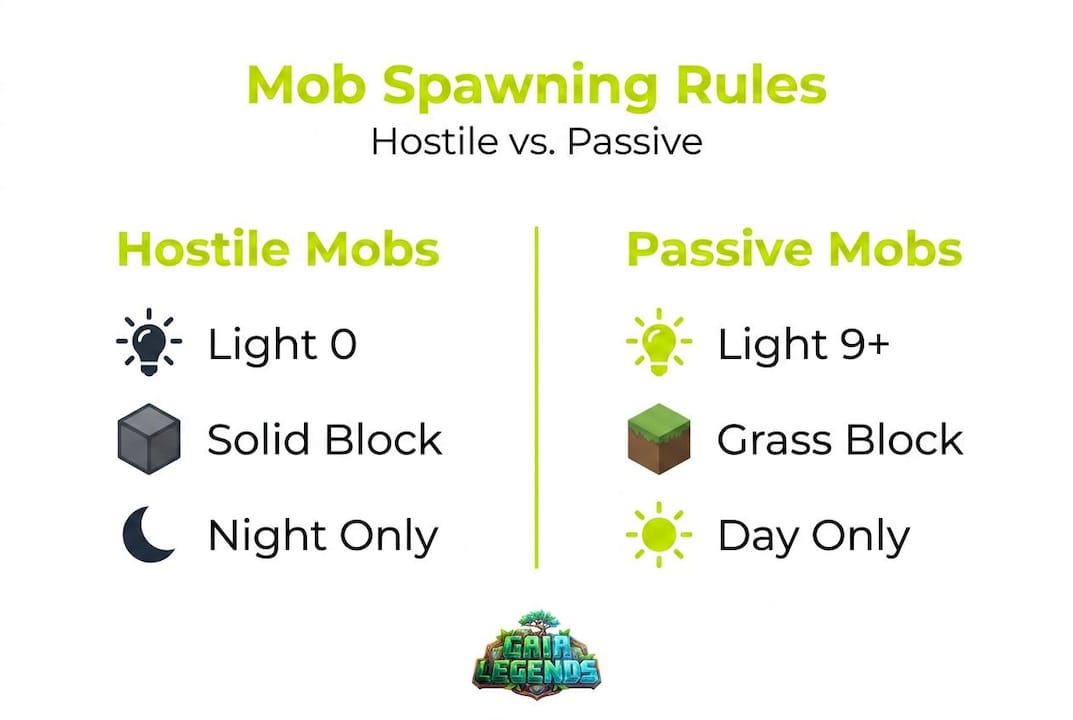
Hostile mobs are the ones that hunt you at night or lurk in caves. As of the 1.18 update, hostile mobs require block light level 0 on solid, opaque spawnable blocks with sufficient headroom, typically 2 blocks tall for most mobs. Before 1.18, the threshold was light level 7 or below, which is why older spawn-proofing guides sometimes recommend more torches than you actually need today.
Passive mobs like cows, sheep, and pigs operate on a completely different system. They need grass blocks to spawn on, and the light level must be 9 or higher. They also spawn very rarely after the initial world generation, which is why your meadow doesn't refill with cows overnight. Knowing this distinction matters a lot for players trying to set up animal breeding operations or food farms.
Here's a quick reference table showing the requirements for both mob categories:
| Requirement | Hostile mobs | Passive mobs |
|---|---|---|
| Block light level | 0 | 9 or higher |
| Surface type | Solid, opaque blocks | Grass blocks |
| Headroom needed | 2 blocks (most types) | 2 blocks |
| Spawn frequency | Every game tick (1/20s) | Rare, mostly at world gen |
| Biome restrictions | Some mobs | Yes, biome-specific |
Understanding mob types and behaviors also helps here, because different mobs have unique restrictions layered on top of these base rules. Slimes only spawn in specific chunks or swamp biomes. Blazes only appear in Nether fortresses. Phantoms spawn when you haven't slept. Each mob type adds another layer to the spawning system, but they all start from these same foundational rules.
One term worth knowing is spawnable block. This refers to any solid, opaque block with enough space above it to fit a mob. Transparent blocks like glass, half-slabs placed at the top of a block, and non-solid blocks like leaves in some configurations do not count as spawnable. This becomes very important when we get into spawn-proofing strategies.
Another critical concept is mob cap. The game limits how many mobs of each category can exist in loaded chunks simultaneously. For hostile mobs in Java Edition, the global cap is 70 (spread across all loaded chunks). Once that cap is hit, new hostile mobs stop spawning entirely. This is one of the most powerful levers you can pull on a server, and we'll dig into it shortly.
Spawn-proofing strategies: torches, slabs, carpets, and spacing
With a solid grasp on spawning conditions, let's look at proven strategies for controlling mob populations in your world.
Spawn-proofing is the practice of modifying your environment so mobs simply cannot appear in specific areas. You're either raising the light level above the threshold for hostile mobs or removing valid spawning surfaces entirely. Both approaches work. The right one depends on your situation.
Torches are the most accessible option, especially early in survival. Place them every 14 blocks to achieve maximum light coverage without gaps. Torches emit light level 14 at their location, and that light fades by 1 per block. At 14 blocks apart, you maintain light level 1 at the midpoint, just above the danger threshold of 0. It takes a little math, but once you internalize this spacing, torching a large base becomes fast and reliable.
Slabs are arguably the most powerful long-term spawn-proofing tool. A top-slab (a slab placed on the upper half of a block) creates a non-full block surface that mobs cannot spawn on. Cover your floors, rooftops, and cave ceilings with slabs and hostile mobs will never appear there, regardless of light level. No fuel needed, no torches burning out (though torches don't actually burn out in vanilla, players sometimes remove them for aesthetic reasons). Slabs are permanent, clean, and effective.
Carpets work similarly. A carpet placed on top of any block prevents mobs from spawning on that surface. They're great for farms, pathways, and decorative spaces where you want to keep mob spawning off without ruining the visual design of your build. Many builders prefer carpets in their houses for exactly this reason.
Here's a comparison of the three main methods:
| Method | Effectiveness | Material cost | Aesthetic impact | Permanent |
|---|---|---|---|---|
| Torches | High (light level) | Low | Moderate | Yes |
| Slabs | Very high | Medium | Low | Yes |
| Carpets | Very high | Low to medium | Low (can match floor) | Yes |
| Buttons/pressure plates | High | Low | Minimal | Yes |
A quick note on buttons and pressure plates: placing these on top of blocks also prevents mob spawning because they count as block occupants. They're a sneaky, low-cost alternative for areas where slabs don't fit the design.
Steps to spawn-proof your base from scratch:
- Light the interior first using torches spaced 14 blocks apart. This immediately eliminates any dark pockets inside your build.
- Cover all flat surfaces in your base with top-slabs, carpets, or buttons for permanent protection.
- Check your roof and outer walls. Many players forget these areas and end up with mobs dropping in from above.
- Dig out and light any caves directly beneath your base within 128 blocks of your position. Dark caves nearby fill the mob cap and reduce farm efficiency.
- Use the F3 debug screen (covered more in the next section) to scan for any block with a light level of 0 that you might have missed.
- Repeat the check after any build expansions, because new rooms or tunnels reset your spawn-proofing progress.
Pro Tip: Stand in the center of your base at night and press F7 (with some mods or shader packs enabled) or check the F3 screen regularly. Any surface showing light level 0 is a guaranteed spawn point. Fix those first before worrying about corners and ceilings.
Connecting these spawn-proofing methods to your broader survival strategy is key. A well-lit, spawn-proofed base means fewer interruptions, no inventory losses to surprise attacks, and a much more enjoyable late-game experience.
Advanced control: mob switches and mob cap manipulation
For those looking to wield even greater control, particularly on multiplayer servers, advanced techniques come into play.

The mob switch is one of the most powerful technical tools in Minecraft. It works by intentionally filling the global hostile mob cap with mobs trapped in spawn chunks. Spawn chunks are the area around the world spawn point that stays loaded even when no player is nearby. If you fill those chunks with exactly 70 trapped mobs (or whatever the current cap is for your version), no new hostile mobs will spawn anywhere in the world. Every player on the server benefits instantly.
Server admins use mob switches to disable spawning globally, which is especially useful on large SMPs where mob lag can tank server performance. From our experience running a 200-player SMP, toggling the mob switch during peak hours made a noticeable difference in TPS (ticks per second), which is the server's performance metric. When TPS drops below 20, the game slows down. Mob switches help keep things smooth.
Here are the key advanced control techniques worth knowing:
- Mob switch construction: Build a structure in spawn chunks that traps exactly enough mobs to hit the global cap. Commonly used mobs include name-tagged zombies or other persistent hostile mobs.
- Mob cap per category: Remember that Minecraft separates mob caps by category (hostile, passive, ambient, water). Filling the hostile cap doesn't affect passive mob spawning.
- Cave lighting for farm efficiency: Light every cave within 128 blocks of your AFK position. Dark, unexplored caves nearby are constantly competing with your farm for available mob cap space. When those caves are lit, your farm claims a larger portion of the cap and produces more drops and XP.
- AFK positioning: For mob farms, AFK between 24 and 32 blocks above the farm's killing floor. Below 24 blocks, mobs despawn too quickly. Above 128 blocks, mobs stop spawning in the farm entirely.
- Persistent mob tagging: Using a name tag on a mob prevents it from despawning. This matters for mob switches and for keeping specific utility mobs like traders alive.
"Lighting the caves within 128 blocks of your AFK point is the single most impactful optimization most players skip. It doesn't take long, and the farm rate improvement is often dramatic." — Gaia Legends SMP team
For efficient mob farm design, these principles are non-negotiable. A poorly positioned AFK point or unlit cave system nearby can cut your farm's productivity in half. Similarly, players who build high-efficiency trading halls need to think about villager counts and the passive mob cap, because overpopulating your trading hall can inadvertently block other passive mob spawning in the area.
The mob switch also opens up an interesting server economy question. On competitive SMPs, controlling the mob switch can become a form of power. Whoever controls the spawn chunks and the switch controls whether hostile mobs appear at all. Some servers build community agreements around this tool to keep things fair.
Optimizing for gameplay: practical applications and common mistakes
With advanced techniques covered, here's how every player, whether solo or server admin, can put spawning mastery into practice.
Let's connect all of this to real scenarios. Say you want to build a zombie XP farm. You need hostile mobs to spawn reliably in a specific location, which means you need the area around your farm to be spawn-proofed and lit except for the farm itself. You also need to position yourself correctly and ensure no competing dark spaces are nearby. Every detail we've covered feeds directly into making that farm work.
For food and resource generation, breeding animals for survival is far more reliable than counting on natural passive mob spawning. Since passive mobs spawn rarely after world generation, you can't depend on cows or sheep appearing organically near your base once the initial world gen is done. Breed the animals you capture early and keep them in a well-lit pen. That's your sustainable food source.
Here's a list of the most impactful optimizations you can make right now:
- Light your whole base perimeter, not just the interior. Mobs spawn on the surface outside your walls and then walk in through gaps.
- Slab your rooftops. Creepers spawning on rooftops and falling into your base is a very real problem on survival servers.
- Clear nearby cave systems before building a mob farm. Even a quick sweep with torches dramatically improves farm rates.
- Use the F3 debug screen to monitor the "local difficulty" and light level values under your cursor as you walk around your base.
- Don't forget the ceiling of underground bases. Many players light the floor but leave the ceiling dark, creating a perfect hostile mob spawn shelf above their heads.
- Position your mob farm correctly. Too close to your AFK point and mobs despawn before reaching the collection area. Too far and they stop spawning.
Pro Tip: Open the F3 screen and look for the line that reads "Light: block X sky Y." The block light value is what matters for hostile mob spawning. If you see block light at 0 on any surface you walk over, that's a spawn point waiting to be filled. Walk your entire base perimeter at night with this screen open at least once after building.
Understanding mob pathfinding mechanics adds another layer here. Mobs that spawn outside your base will path-find toward you through any opening. Spawn-proofing the exterior slows this down significantly. Combine that with a well-lit base and you've created multiple layers of defense that compound together.
Common mistakes we see even experienced players make:
- Relying only on torches and not using slabs or carpets as backup
- Forgetting that new builds expand the spawn-proofed area requirements
- Using sea lanterns or glowstone for lighting but leaving small dark pockets in corners
- Placing slabs at the bottom of a block (bottom-slab) instead of the top, which doesn't prevent spawning
- Not lighting water surfaces or the bottom of ponds, where drowned can appear
That last point catches a lot of players off guard. Drowned (the underwater zombie variant) have their own spawn rules and can appear in ocean and river biomes even in well-lit conditions if the underwater blocks themselves aren't covered.
The hidden complexity and game-changing power of mob spawning mechanics
Most players treat mob spawning as background noise. It's just something that happens while they're doing more interesting things. But players who actually study the system quickly realize it's one of the most leverageable mechanics in the entire game.
Here's the contrarian take worth sitting with: the goal shouldn't just be stopping mob spawns. The real skill is directing them. A well-designed mob farm turns the spawning system into a factory. XP flows in, loot accumulates, and your character powers up passively while you do something else. Mob spawning, properly controlled, is one of the best resource-generation systems in Minecraft.
We've watched hundreds of players on our SMP struggle with mob farms that barely produce anything. Almost every time, the problem isn't the farm design itself. It's everything outside the farm. Dark caves within 128 blocks stealing mob cap. AFK positions that are slightly off. Light levels at 1 instead of 0 inside the farm's spawning platforms. Small details with large consequences.
The hard-won lesson from years of server management is this: spawn-proofing is never "done." Every time you expand your base, add a new farm, or explore new caves, the balance of your spawn environment shifts. The players who stay ahead of it are the ones who make testing and reviewing part of their routine, not a one-time setup.
There's also a server economy angle here that's easy to miss. On survival multiplayer servers, mobs drop materials that feed crafting economies. Blaze rods fuel brewing. Wither skeletons provide nether stars. String from spiders goes into fishing rods and bows. Players who control efficient mob farms can supply these materials to the community and build real in-game wealth. Mastering mob navigation and spawning mechanics together creates a significant competitive edge in any active survival server.
The encouragement we'd offer is simple: don't be intimidated by the depth. Start with the basics, light your base properly, understand the mob cap, and try one farm build. Watch how the spawn rates respond to your adjustments. Experiment, benchmark, and adapt. The mechanics reward curiosity, and every player who puts in the time to understand them ends up with a noticeably better game experience.
Unlock further Minecraft mastery with Gaia Legends guides
Ready to push your Minecraft knowledge even further? The mob spawning system is just one part of a much larger picture, and we've got your back every step of the way.

At Gaia Legends, we publish five in-depth guides every day covering everything from survival techniques and combat strategies to farm builds and server management. Our content is grounded in real experience running a 200-player SMP and cross-checked against the Minecraft Wiki and official Mojang changelogs. Whether you're fine-tuning a mob farm, planning a massive survival build, or managing a server community, our guides give you accurate, practical answers you can act on immediately. Visit Gaia Legends and explore the full library. Your next breakthrough is one guide away.
Frequently asked questions
What causes mobs to spawn in Minecraft?
Hostile mobs spawn at block light level 0 on solid opaque blocks with enough headroom, while passive mobs need grass blocks and light level 9 or higher to appear.
How can I stop mobs from spawning in my base?
Place torches every 14 blocks for light coverage, and use top-slabs or carpets on floors and rooftops to permanently remove valid spawning surfaces.
What are mob switches and how do they work?
Mob switches fill the mob cap by trapping enough mobs in spawn chunks to hit the global limit, which stops hostile mobs from spawning anywhere else in the loaded world.
Why are mobs not spawning near me even when conditions seem right?
A full mob cap, incorrect AFK distance, or dark caves competing for cap space within 128 blocks of your position are the most common culprits.
Do passive mobs respawn after initial world generation?
Passive mobs spawn very rarely after world gen, mainly on grass blocks with light level 9 or higher, so breeding is a far more reliable source of animals than waiting for natural respawns.
Recommended
Frequently Asked Questions
Discussion
Join the Discussion
Start at Seeker — climb to Legend through the ranks
Every comment earns you progress. Reach new ranks to unlock mystery box rewards on the Gaia Legends server. The more you share, the higher you climb.
No comments yet
Be the first to share your thoughts and earn your Seeker rank.